1.Determine your gallery wall location
What part of your home are you looking to cover? Remember: You don’t have to stick to that one long swath of empty wall; in fact, we think some of the more interesting gallery walls are those in unconventional places, like around a corner (which Keenan did above), along a staircase, within a window seat, or around a doorway—the options are truly endless.
- Assemble your art
Once you’ve selected a location, assemble your art. And remember, this doesn’t have to be a set of matchy prints in coordinated frames. In fact, assures Keenan, “random assortments can make for the most compelling collections. Don’t overthink it!” Frame a postcard from a favorite vacation, coasters or matchsticks from a meaningful restaurant, kids’ artwork, or even plates (Need some options? Here are the best places to buy wall art online). Keenan suggests laying your options out on the floor below the wall you’re going to cover.
- Measure
Before you begin hanging, you’ll want to measure the amount of space the gallery wall will take up. Measure height and width, leaving a few inches of space above any furniture and below crown molding.
- Place large objects and accessories
At this point, you’ll want to ensure any furniture and larger accessories (table lamps, tall floor lamps, etc.) are in place, so you can plan to hang the art around them.
- Disperse art
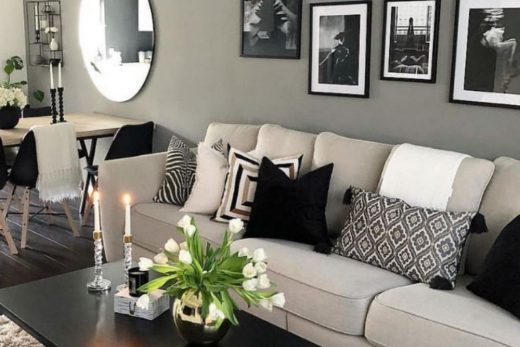
Now, begin arranging your art (on the floor) within these parameters to determine your layout. Remember: it doesn’t have to be symmetrical! As long as there’s balance in the heights (meaning the arrangement doesn’t slope to one side), you’re good. If you’re doing a more eclectic mix, you’ll want to give some variety, separating pieces of similar color, size, and texture. “Look for adjacent contrasts with art and furniture,” Keenan suggests. “Contrasts in color or texture create more visual interest.” If you’re feeling overwhelmed, a good process is to begin with the largest pieces. Once you’ve placed them spaced evenly, pepper in smaller and smaller items. Continue playing with the arrangement until you like the look of it.
- Mock up (optional)
If you’d like an extra check on your layout, do a mock-up using painter’s tape: Measure the area of each piece in your gallery wall and outline it in tape on the wall. If you’ve arranged your art on the floor in a space that’s the same size as your wall, this shouldn’t be necessary, but if you’re unsure, nervous to start nailing, or having trouble visualizing, it can be a great extra step.
- Hang
Once you’re happy with the layout, you can move onto the final part: Hanging! “Begin by hanging the most important piece, then start hanging pieces around the first piece,” advises Keenan. And if you need to make adjustments as you go, don’t worry! Need help determining how exactly to hang each piece?


